Ticket sales using the stock function
Set up Kindo to sell tickets to your school productions, quiz nights and discos easily, using the steps described in this guide.
The stock function is useful for all sorts of items - selling tickets to productions, selling uniform items, food days when your stock is running low and you don't want to oversell (e.g. at the end of the year if you don't want to buy more stock to have to store over the holidays).
The stock function is useful for all sorts of items - selling tickets to productions, selling uniform items, food days when your stock is running low and you don't want to oversell (e.g. at the end of the year if you don't want to buy more stock to have to store over the holidays).
Stock levels can be set at any time by the menu administrator using the item editor. Once stock has been entered, it can be updated either in the item editor or by the order administrator on the Order Status & Reporting page, under 'Stock Levels'.
Covered in this Quick Guide are:
- Ticket Sales - how it will look on your Kindo Shop site
- Creating the listing - Menu Administrator
- Creating the home page service icon - Service Administrator
- Hiding the service icon - Service Administrator
- Checking and updating stock numbers - Order Administrator and Menu Administrator.
Ticket Sales
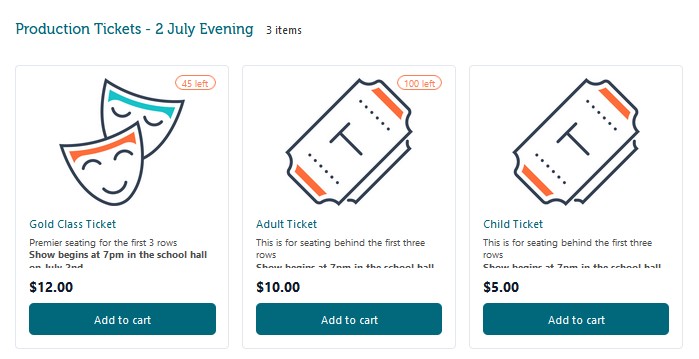
For your caregivers, your Kindo Shop will look something like this:
On the home page of your Kindo Shop,
users will see the service tabs across the top of the page and again under 'More to explore' further down on the home page along with the service icons. Once they have opened the service they will then see the different
performance dates (categories) and the tickets (items) for each of those
performances.

Users can purchase tickets by clicking
on 'Add to cart' and selecting the student's name. This will add the item to
their cart.

You can add stock numbers if you need to limit the
number of ticket sales for each performance.
Kindo will count down the number of
tickets available automatically, and once you reach zero, no more tickets will
be able to be purchased and ‘Sold Out’ will be displayed.
You
can also add in questions or statements if you need to, and you have the option
of making these compulsory or optional.
Creating the listing
All set up is done on our partner
website: https://partner.kindo.co.nz
1. On the partner site,
select Item Editor and check you are operating as the correct supplier.
2. Select add new.
3. Add your category name to the pop-up box, e.g. Production Tickets - 2 July Evening. Leave ‘Has daily order cutoff’ unticked. Select done.
4. Select Add new item.
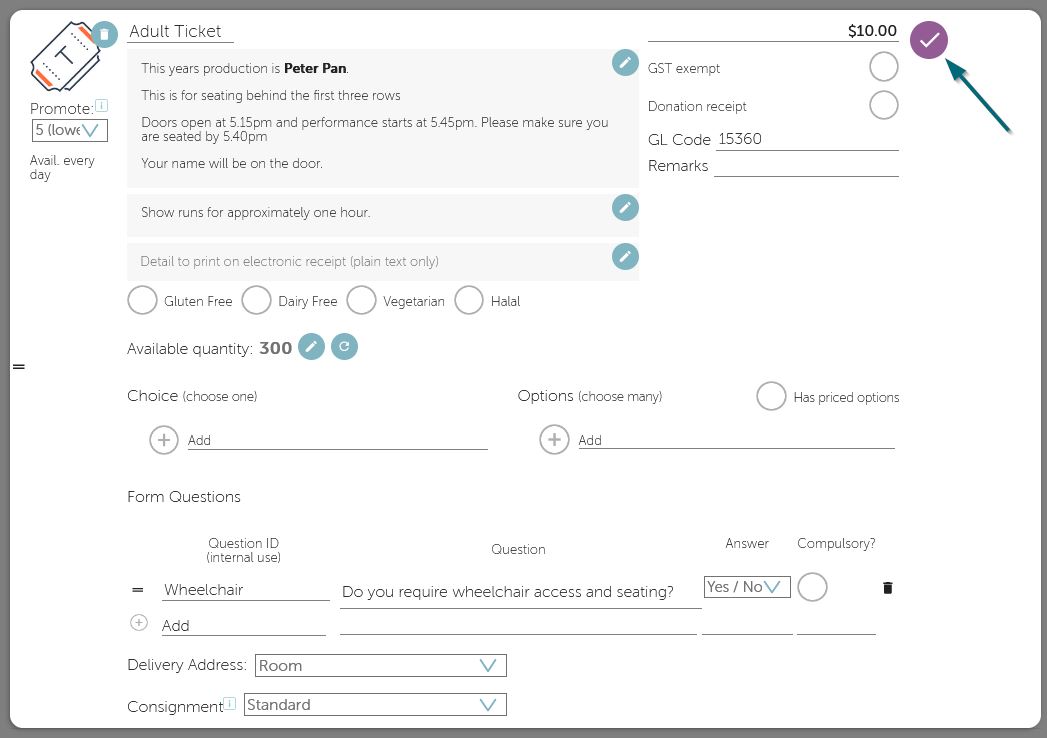
Start entering the
information for your ticketed event. Each step is numbered in the picture
below.
5. Enter the name of your item, e.g. Adult Ticket.
6. Enter the price of
your item.
7. Enter the General
Ledger code, this won’t be visible to users but will be visible on your
internal reports.
8. If you need to, add any
other details you need on your reports into the Remarks field.
9. Add an image.
Clicking here will bring up the image upload box. You can add jpg, bmp, gif
& png files but they must be under 5MB.
10. Ensure that the item is available for purchase every day
(click to change if not).
11. Enter important
information in the add summary field. This information will show up automatically
on the screen, under the name of the item.
12. If there is more
information you’d like to add, enter it into the add description field. Users
will see this information if they click anywhere inside the item’s box.

If using the add description field, add the words “click here for
more information” somewhere in the add summary field so users know to access
the additional information.
13. If you want anything to be
printed onto the electronic receipt that gets sent, enter it in Detail to print
on electronic receipt.
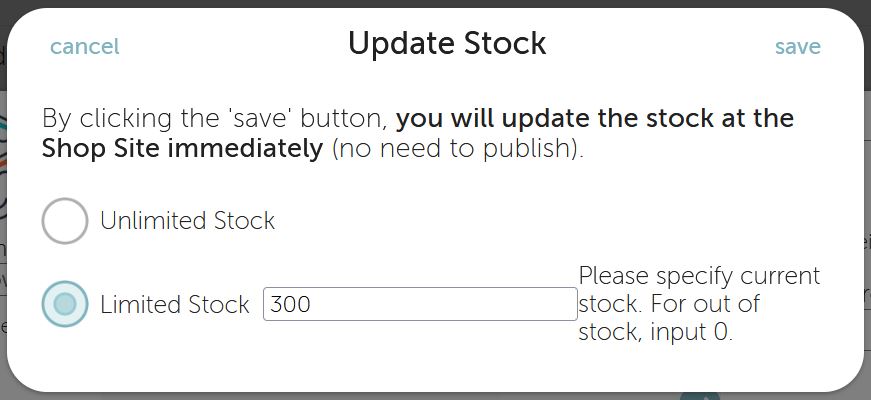
14. Edit the Available quantity by clicking the pencil icon. This will bring up the Update Stock screen
where you can choose to specify the number of tickets available. Select 'Limited Stock' and specify the current number of stock.

15. Add any Form Questions here, e.g. wheelchair access.
16. The Delivery Address defaults to Room. If you are selling tickets to people outside of your school community,
you may wish to change the delivery address to 'Room or Address'. Alternatively, you may like to use our Community Shop feature, for further information please see our article on Creating Your Kindo Community Shop.

Talk to our Helpdesk team for the best way to manage sales
to people outside of your school community.
17. Select the tick next to
the price when you are happy with the details.

18. To create another item
similar to the one you have just created, e.g. another ticket type, performance time or day,
select Duplicate item to create a copy.
19. Edit the name, price, and
any other details for the new items.

The duplicate
function will copy over all the details from the item, including add summary
and description information, and any questions.
It will not copy over pictures or stock numbers, so you will need to
upload a picture and adjust stock numbers for each item.
20. Once you have created
items for each performance, ensure you Save & Publish.
By following the steps
above you have created the Category, e.g. Production Tickets – 2 July
Evening and added some items to the category, e.g. Gold Class Ticket, Adult Ticket and Child Ticket.

Now the Service
Administrator needs to add these categories to your school shop by creating the
Home Page Service Icon.
Creating the home page service icon (Service Administrator)
Once you have created your categories, you then need to create a Home Page service icon and set the dates for your service. Please refer to our article on Creating a new home page service which uses a School Production as an example.
Hiding the Service Icon
When creating the service icon as above, the availability of the service was set for the period of time you will be selling tickets to the production, for example 6 June to 30 June. Outside these dates the Service Icon
will still be on your shop site unless you “disable” or hide it. Disabling/hiding the service icon before ticket sales
start and after the production is finished prevents your Kindo shop from
becoming too cluttered for your users. For further information please refer to our article on Disabling a home page service
Checking and Updating the Available Quantity/Stock Numbers
Checking the available quantity/stock numbers and viewing orders and reports is done on our shop (live) website: https://shop.kindo.co.nz
Checking the available quantity/stock numbers and viewing orders and reports is done on our shop (live) website: https://shop.kindo.co.nz
You can update available quantity/stock numbers of items at any time on the Partner site (https://partner.kindo.co.nz) by editing the item using the stock function, or on the Shop site (https://shop.kindo.co.nz) via the Order Status & Reporting page, under 'Stock Levels'.
Related Articles
Using the stock function
Access: Menu Administrator The stock function allows you to enter in the quantity available of an item. Every time a purchase is made, Kindo will count down the available quantity. Once there are none left, SOLD OUT will appear and users will be ...Raffles and Online Ticket Sales - FAQs
We often get asked whether schools can use the Kindo platform to sell raffle tickets online. Here’s a quick guide to what’s allowed under New Zealand’s Gambling Act, and how your school can stay compliant. What kinds of school raffles are there? ...Managing stock levels
Stock levels let you control how many of an item can be purchased. When a quantity is set, Ezlunch & Kindo automatically count down sales and show Sold Out when the limit is reached. This article shows you how to set, update, and reset stock levels, ...Uniform Listings with size and stock levels
UNIFORM LISTINGS WITH SIZE AND STOCK LEVELS If you want to use the stock function, i.e. you have a limited supply of certain items and do not want to oversell, then you will need to list each size of each item as a different listing: Jnr Shirt - size ...Quick Guide to setting up (an undated) service
Access: Menu Administrator Creating categories Creating items Service Administrator Creating the service icon Linking categories to the service Hiding/disabling the service Schools and Organisations can set up registrations and permission forms, ...